
How to Install LED Strip Light Under Cabinets Using 110V: A Complete DIY Guide
Table of Contents
Adding LED strip lights under your kitchen cabinets can completely transform the look and functionality of your space. It adds task lighting, enhances visibility while cooking, and gives your kitchen a modern, ambient glow.
In this guide, you’ll learn how to install LED strip light under cabinets using 110V power safely and effectively—even if you’re not an electrician. We’ll also explore the tools you’ll need, safety tips, types of LED strips to choose from, and common mistakes to avoid.
Why Use 110V LED Strip Lights?
Most LED strip lights run on low voltage (12V or 24V), which require a separate power supply. However, 110V LED strip lights are designed to plug directly into a standard household outlet, making installation simpler and ideal for DIY homeowners.
Advantages of 110V LED Strip Lights:
- No need for bulky transformers or power supplies
- Longer runs (up to 150 feet) without voltage drop
- Easy to plug in and operate
- Great for large kitchens or full cabinet installations
Tools and Materials You’ll Need
Before getting started, gather the following materials:
Tools:
- Tape measure
- Scissors (if your strip is cuttable)
- Screwdriver or drill
- Pencil or marker
- Cable clips or adhesive mounts
- Wire stripper (optional for hardwiring)
Materials:
- 110V LED strip lights (with power cord)
- Mounting brackets or strong double-sided adhesive tape
- Optional: inline switch or dimmer
- Optional: junction box or outlet for clean installation
Step-by-Step: How to Install LED Strip Light Under Cabinets Using 110V
Let’s walk through the installation process:
Step 1: Choose the Right 110V LED Strip Lights
Not all LED strip lights are created equal. Here’s what to look for:
- Waterproof rating (IP65 or higher) for kitchens
- Color temperature: Warm white (2700K–3000K) for a cozy look, cool white (5000K) for a modern, bright kitchen
- CRI rating above 80 for true color rendering
- UL-listed or certified for safety
Make sure the LED strips come with a plug-and-play power cord suitable for 110V, and check if they’re cuttable to fit your cabinet layout.
Step 2: Plan Your Layout
Measure the total length under your cabinets to determine how many feet of LED strip you need. Plan where:
- The strips will start and end
- You’ll hide the power cord or plug it in
- You’ll mount the strips (typically toward the front underside of the cabinet)
Mark the spots using a pencil for guidance.
Step 3: Clean the Surface
Before mounting the LED strips, clean the bottom surface of your cabinets using rubbing alcohol or mild soap. This helps the adhesive stick better and prevents strips from falling off later.
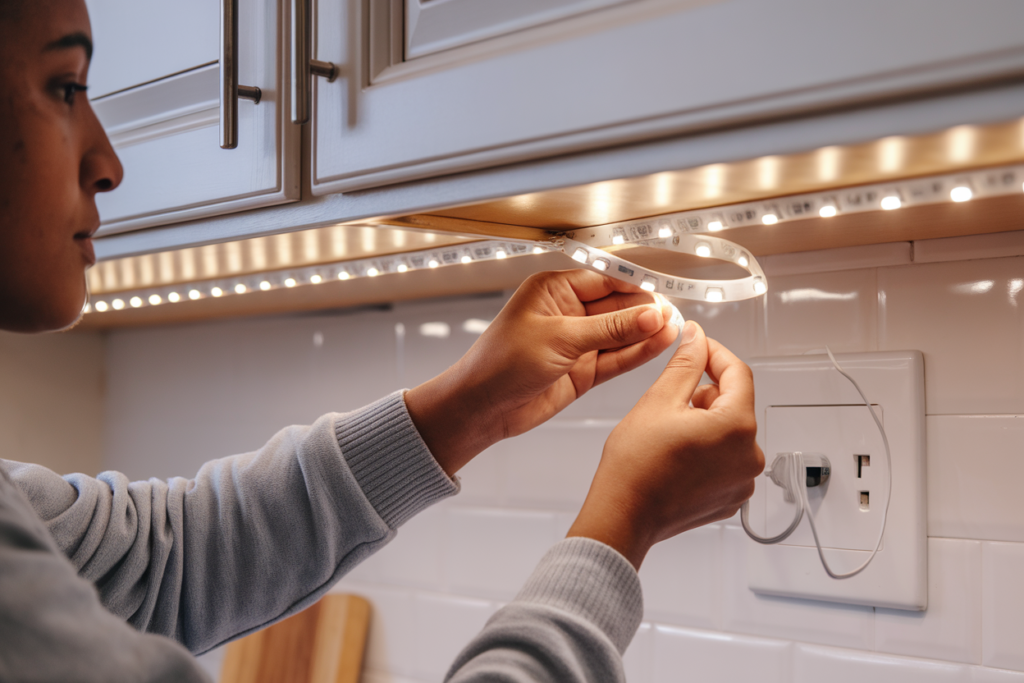
Step 4: Attach the LED Strip Lights
There are two common ways to mount the LED strips:
1. Adhesive Tape
Peel the backing and press the strip firmly into place. Hold for a few seconds for a strong bond.
2. Mounting Clips or Brackets
Screw in the plastic clips every 12–18 inches and snap the LED strip into place.
🔧 Tip: Adhesive may fail over time in warm kitchens. Use clips for long-term reliability.
Step 5: Connect the Strip to the 110V Power Source
Most 110V LED strips come with a pre-attached plug. Simply plug it into a nearby outlet. If you don’t want exposed cords, consider:
- Adding an inline switch or dimmer
- Installing a dedicated outlet inside the cabinet
- Hardwiring the strip using a junction box (hire an electrician for this)
Step 6: Test the Lighting
Once installed and powered, check the strip:
- Does the entire length light up evenly?
- Is the light color consistent?
- Are the wires neatly hidden?
If you see dark areas or flickering, check your connections or cut points.

Safety Tips When Installing 110V LED Strip Lights
- Never cut the strip unless it’s marked as cuttable
- Don’t exceed the maximum run length (usually around 150 feet)
- Avoid installing near water unless the strip is waterproof
- Don’t overload the circuit—use only one strip per plug if unsure
Optional: Add a Dimmer or Smart Control
Want to control brightness or turn your under cabinet lights on and off with a voice assistant? Here’s how:
Options:
- Inline dimmer switch (simple plug-in option)
- Smart plug (works with Alexa or Google Assistant)
- Wall dimmer switch (requires hardwiring)
Adding smart control can improve convenience and energy savings.
Common Mistakes to Avoid
- Installing too far back under the cabinet: This causes shadows on the counter.
- Not securing the strip properly: Loose strips can fall off due to heat and humidity.
- Using the wrong LED type: 12V strips won’t work with 110V directly.
- Forgetting to measure carefully: Order 10–15% extra length just in case.
Benefits of LED Strip Lighting in the Kitchen
- Energy-efficient and long-lasting
- Adds ambiance and elegance
- Improves task visibility (especially near sinks and stoves)
- Increases home value with modern aesthetics
Conclusion: Illuminate Your Kitchen with Confidence
Installing LED strip lighting under your kitchen cabinets using 110V power is one of the most rewarding home improvement projects you can do on your own. It enhances both the functionality and appearance of your kitchen, creating a space that’s well-lit, modern, and inviting. With just a bit of planning and some basic tools, you can transform your kitchen from average to impressive—no electrician required.
Whether you’re a DIY enthusiast or a first-time installer, this guide has walked you through everything you need to know. From selecting the right type of LED strip lights to measuring, mounting, and safely connecting to a 110V outlet, you now have the knowledge and confidence to execute this project with precision.
Why LED Strip Lighting Is a Smart Investment
Incorporating LED strip lights under cabinets is not just about aesthetics—it’s also about practicality. LED technology has advanced significantly, offering better brightness, lower energy consumption, and long-lasting durability. Many 110V LED strips are capable of running up to 150 feet without voltage drop, making them an excellent option for larger kitchens or open-concept spaces.
Additionally, 110V LED strips eliminate the need for separate transformers or power supplies, which simplifies installation. That makes them especially appealing to homeowners who want a fast, efficient upgrade without complex wiring.
By adding LED strip lights to your kitchen cabinets, you can:
- Improve visibility for cooking, reading recipes, and cleaning
- Add ambient lighting to enhance mood and style
- Highlight backsplashes, countertops, or architectural features
- Save energy with high-efficiency LED technology
- Increase your home’s value with modern lighting upgrades
What Makes 110V LED Strip Lights Unique
Unlike traditional low-voltage LED strips (like 12V or 24V systems), 110V LED strip lights plug directly into standard wall outlets. This feature alone removes the complication of adding a bulky transformer, making them especially suitable for DIY users.
However, it’s still important to choose high-quality strips that are UL-listed and rated for indoor use, especially in the kitchen where moisture and heat are present. You also need to follow safety guidelines and avoid overloading your outlets, particularly if you’re installing multiple strips.
As we’ve covered, installing LED strip lights requires a bit of preparation: measuring your cabinet length, planning power placement, cleaning the mounting surface, and securing the strips with clips or adhesive. These steps might seem minor, but they play a crucial role in ensuring a neat, professional-looking result that lasts.
Take It to the Next Level
Once you’ve mastered the basics, there are plenty of ways to expand or customize your setup. For example, you can:
- Add a smart plug to control your lights with Alexa or Google Assistant
- Install a dimmer switch to adjust brightness levels for different tasks or times of day
- Use RGB LED strips for color-changing effects
- Connect motion sensors so the lights turn on automatically when you walk into the kitchen
These enhancements can elevate your lighting system even further, turning your kitchen into a space that’s not just functional—but delightful to use.
Final Thoughts
Lighting plays a huge role in how we experience a room. In the kitchen—where we prepare meals, gather with family, and often start and end our day—good lighting makes all the difference. By learning how to install LED strip light under cabinets using 110V, you’ve empowered yourself to make a big impact with a relatively small investment.
So now that you’re equipped with the right information and tools, it’s time to take action. Start planning your layout, pick the right LED strip, and bring your kitchen lighting vision to life.
With care and creativity, your kitchen will soon be shining brighter—and smarter—than ever before.
FAQ: How to Install LED Strip Light Under Cabinets Using 110V
1. Can I plug LED strip lights directly into a 110V outlet?
Yes, as long as the strip is designed for 110V and comes with a power cord.
2. Do I need a transformer for 110V LED strips?
No transformer is needed. 110V strips have built-in voltage regulators.
3. Is it safe to use LED strip lights under cabinets in the kitchen?
Yes, especially if you use waterproof or heat-resistant strips and follow basic safety precautions.
4. Where should I place the LED strip under the cabinet?
Place it near the front underside of the cabinet for the best countertop lighting.
5. Can I cut the 110V LED strip light to fit my cabinets?
Only if the product is marked “cuttable” and at specific cut points.
6. How do I hide the power cord?
Use cable raceways, adhesive clips, or hide it inside the cabinet with a hole drilled for access.
7. Can I install a dimmer switch on a 110V LED strip light?
Yes, but make sure the dimmer is compatible with high-voltage LED lighting.
8. What’s the difference between 12V and 110V LED strips?
12V requires a power adapter and has a shorter max length; 110V plugs directly into a wall outlet and supports longer runs.