

How to Remove Bathroom Exhaust Fan Cover with Light
Table of Contents
If your bathroom exhaust fan is starting to look dirty or the light isn’t working properly, it might be time to remove the cover for cleaning or maintenance. Fortunately, learning how to remove bathroom exhaust fan cover with light is easier than you might think, even if you’re not an electrician or DIY expert.
In this comprehensive guide, we’ll walk you through the step-by-step process to safely remove your bathroom exhaust fan cover with a light fixture. Along the way, we’ll also cover related topics like how to clean a bathroom exhaust fan with light, how to install or replace one, and how to wire a bathroom exhaust fan with light if you’re planning a more complete upgrade.
Why You Need to Remove the Bathroom Exhaust Fan Cover
Before diving into the how-to, let’s understand why removing the exhaust fan cover is essential:
- Dust and grime build-up: Over time, your fan cover collects dust, moisture, and even mold, which can reduce airflow and affect air quality.
- Light issues: If the built-in light isn’t working, the cover must be removed to replace the bulb or troubleshoot wiring.
- Routine maintenance: Removing the cover gives you access to the motor and vent, allowing for periodic cleaning and inspection.
Now let’s get started.
Tools You’ll Need
You don’t need a lot of tools to remove the exhaust fan cover with light, but here are a few basics that can make the process easier:
- Screwdriver (usually Phillips)
- Flashlight or headlamp
- Small ladder or step stool
- Soft cloth or vacuum with brush attachment
- Voltage tester (if working with wiring)
- Dust mask (recommended for cleaning)
How to Remove Bathroom Exhaust Fan Cover with Light: Step-by-Step Instructions
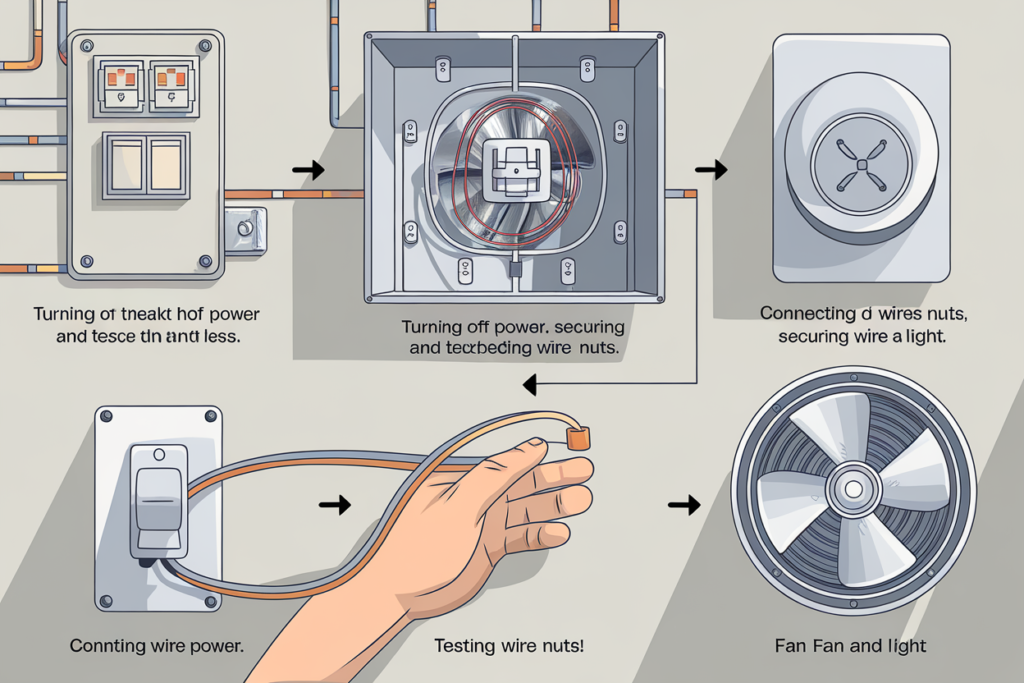
Step 1: Turn Off Power
This is the most important step. Before touching anything, switch off power at the circuit breaker. You don’t want to risk electric shock, especially if you’re dealing with a fan-light combo.
Step 2: Remove the Light Cover
Most exhaust fans with lights have a separate plastic cover or glass dome over the bulb. Look for notches or clips around the cover:
- Push-in clips: Gently squeeze the sides and pull downward.
- Screws: Use a screwdriver to loosen and remove them.
Once removed, you’ll have access to the bulb.
Step 3: Remove the Light Bulb
Carefully unscrew the light bulb and set it aside. This makes it easier to access the fan housing.
Step 4: Release the Fan Cover
Now comes the main step—removing the fan cover. There are two common methods:
Method A: Spring Clips
Most modern fans have spring-loaded clips:
- Gently pull the cover down a couple of inches.
- Reach inside on each side to feel the metal clips.
- Squeeze the clips together and gently release them from the slots.
Method B: Screwed Cover
Older models may have screws holding the cover:
- Use your screwdriver to remove the screws.
- Carefully pull the cover downward.
At this point, your fan cover should be completely removed.
How to Clean a Bathroom Exhaust Fan with Light
Now that the cover is off, it’s a perfect time to clean the fan and light:
- Vacuum the cover and fan blades using a soft brush attachment.
- Wipe down all surfaces with a damp cloth and mild detergent.
- Clean the light fixture, including removing any bugs or dust.
- Let everything dry before reinstallation.
Cleaning your fan every 6–12 months improves efficiency and extends the life of the unit.
How to Reinstall the Cover After Cleaning
Once everything is clean:
- Align the cover back into position.
- If using spring clips, squeeze and reinsert them into the housing slots.
- If using screws, line up the holes and tighten the screws.
- Replace the bulb and snap or screw the light cover back in.
- Turn power back on and test both fan and light.
How to Replace a Bathroom Exhaust Fan with Light
If your fan is outdated or noisy, you might consider replacing it. Here’s a basic overview of how to replace a bathroom exhaust fan with light:
- Turn off power at the breaker.
- Remove the old fan using the same steps above.
- Disconnect wires (make sure to label them).
- Install the new unit according to the manufacturer’s instructions.
- Reconnect wiring (see wiring section below).
- Secure the housing, attach the new cover, and test.
How to Install Bathroom Exhaust Fan with Light
If you’re installing one for the first time:
- Choose the location near the shower or tub for proper ventilation.
- Cut an opening in the ceiling based on fan size.
- Install ductwork leading to an exterior vent.
- Secure the fan housing between ceiling joists.
- Connect wiring and switch control (see below).
- Install the light bulb and cover, then test.
Tip: Many fans now come with humidity sensors and timers, making them more energy-efficient.
How to Install a Bathroom Light with Exhaust Fan
If you already have a light and want to add an exhaust fan, you’ll likely need to:
- Install a combo unit
- Update wiring and switches
- Route ductwork to the roof or wall vent
Make sure the fan is rated for bathroom use and offers at least 50–80 CFM (cubic feet per minute) for effective ventilation.
How to Wire a Bathroom Exhaust Fan with Light
To wire a bathroom exhaust fan with light, begin by turning off power at the circuit breaker for safety. Use a dual switch if you want to control the fan and light separately. Connect the black wire to the fan switch and the blue (or second black) wire to the light switch. Join all neutral (white) wires together and connect the ground wires to the grounding screw. Secure all wire nuts, tuck the wires into the box, mount the fan, then restore power and test. Make sure to follow local electrical codes or consult an electrician if unsure.
For One Switch Operation:
If you’re using one switch for both fan and light:
- Connect black and blue wires together to hot wire.
- Connect all neutrals together (white).
- Connect all grounds (green/bare).
For Two Switches:
If you want to control the fan and light separately:
- Connect black to one switch (fan).
- Connect blue to another switch (light).
- Whites and grounds stay the same.
Warning: Always use a voltage tester and follow local electrical codes. If unsure, hire a licensed electrician.
Troubleshooting Tips
- Fan not turning on? Check the breaker, bulb, and connections.
- Fan noisy? Clean it thoroughly or consider replacing the motor.
- Light flickering? Could be a loose bulb, faulty wire, or outdated light fixture.
FAQs About Bathroom Exhaust Fans with Lights
1. Can I clean my bathroom fan without removing the cover?
You can clean the outer part, but for a deep clean, removing the cover is essential.
2. How often should I clean my exhaust fan?
At least twice a year, especially if you notice it getting louder or less effective.
3. Can I replace just the light bulb?
Yes. If your fan is still working well, just remove the light cover and replace the bulb.
4. Is it safe to remove the fan cover while it’s still powered?
No. Always turn off power at the circuit breaker to avoid electric shock.
5. Can I install a fan-light combo where there’s just a light?
Yes, but you’ll need to ensure there’s room for ductwork and update the wiring.
Final Thoughts
Knowing how to remove bathroom exhaust fan cover with light is a simple but essential skill for any homeowner. Whether you’re doing a routine cleaning, replacing a light bulb, or planning a full upgrade, taking care of your bathroom ventilation ensures a healthier, more comfortable space.
We’ve also covered how to clean, install, replace, and wire your fan-light combo—making this a complete guide for every stage of your fan’s lifecycle. Keeping your bathroom fan in good shape doesn’t just make your space look better; it helps prevent moisture buildup, mold, and mildew.
Take 30 minutes to give your bathroom fan the attention it deserves. You’ll breathe easier—and your bathroom will shine brighter.